Endercraft
Moderator
This thread is for those who need to run ADB commands on their devices locally and automatically, as well for those whose devices don't support ADB hack to do certains operations - for example enabling/disabling mobile data on Xiaomi.
Here we will be using Termux to run these commands.
Big thanks to @tanutanu (who made the original method) and @Dimlos (from which I learned a lot about how to use Termux and adb with Termux).
Hopefully this thread is good enough for most to understand.
If you haven't done this before, it would be great to have some feedback on how well that works. It can be simplified further but at this point you could just make a macro that does this for you.
Here we will be using Termux to run these commands.
Big thanks to @tanutanu (who made the original method) and @Dimlos (from which I learned a lot about how to use Termux and adb with Termux).
- Install Termux (https://f-droid.org/en/packages/com.termux) and Termux:Tasker (https://f-droid.org/en/packages/com.termux.tasker).
- Open Termux. Run the following commands :
yes | apt update yes | apt upgrade yes | pkg install vim yes | pkg install nmap yes | pkg install android-tools mkdir -p ~/.termux/tasker cd ~/.termux/tasker - Open developer options (google how to do it on your device if you don't know how).
- Enable USB debugging, install apps via USB and USB debugging (secure settings).
From this point, the method differs a bit according to your Android version. - If you are on Android 10 or below (for those with Android 11+ you can completely automate this process if you are connected to wifi, skip to here however this is less complicated).
- Connect your device to a computer via USB.
- Download ADB on your computer from these sources according to the model :
Windows - https://dl.google.com/android/repositor ... indows.zip
Linux - https://dl.google.com/android/repositor ... -linux.zip
Mac - https://dl.google.com/android/repositor ... darwin.zip - In the folder containing the file adb.exe, open a new command prompt (make sure it is opened in the directory where adb.exe is located else it won't work !).
- Type the command
adb devices. If you are on Mac or Linux, add./before the command else it won't work. - On your device, you should see a prompt asking you to confirm if you want to allow the connection. Accept this prompt.
- On your computer, type
adb tcpip 5555(again, add./before the command if on Mac or Linux). This needs to be done every time you reboot your device.
[Marker for those who wish to automate everything on Android 11+] [if you are on Android 10 or below, skip to here] - Open Wireless debugging in developer options. Enable it and enable split screen on your device to have both the settings app and Termux open.
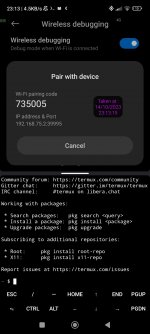
- In wireless debugging, tap on Pair device with pairing code. You will see a 6 digit pairing code, and below it an IP address and port (you only need the port which is located after the colon, for example 192.168.0.101:39204)
- In Termux, type
adb pair localhost:port. Replace "port" you the port you obtained from the pairing prompt. You should be prompted to enter the pairing code on Termux. Type this code and press enter (allow connect prompt if asked to).
This is what your window should look like :

- Run
adb tcpip 5555 && adb kill-serverto setup everything. - Download the
nmap.shfile from here : https://www.mediafire.com/file/03869ly4rq9h7gl/nmap.sh/file - Once that's done, open Termux and run the command
termux-setup-storage. Allow Termux to access all files when prompted. - Run the command
path=$(find /sdcard/ -name nmap.sh 2>/dev/null) && cp $path ~/.termux/tasker && chmod +x ~/.termux/tasker/nmap.sh. This will automatically copy the file to the desired location (instead of installing another app and doing it manually). - In MacroDroid app info (google how to open on your device), enable the permission Run commands in Termux environment.
- Exclude Termux and Termux:Tasker from battery optimizations and allow them to autostart if necessary.
- Import the attached macro in MacroDroid. Do a test run by testing the empty trigger or macro actions (make sure you have performed ADB hack before else it will not work correctly) : if a popup message saying success (it's not instant, wait a few minutes at most) apeears then you have set up everything correctly. You should check in the Termux notification : it should contain "1 task".
[Marker if you have done adb tcpip 5555 from your computer] - If everything works correctly, you have the choice : you can either run commands from Termux using Termux:Tasker, in which case you can run every adb commands or you can use an app only able to run shell commands called ADB Shell [Tasker Plugin] : https://play.google.com/store/apps/details?id=com.ADBPlugin ; there is a good chance the Play Store will tell you the app is too old for your device, however that's a lie. You can install directly from https://m.apkpure.com/adb-shell-tasker-plugin/com.ADBPlugin
- If you are going with the ADB Shell tasker plugin option : using a plugin action in MacroDroid, you can select that app to run ADB shell commands. In the IP address field, enter
localhost; in the port field, enter5555; in the ADB Shell Command field, enter your command (if it'sadb shell pm list packagesfor example, you will have to removeadb shellfrom the command) ; in the ADB timeout in ms, you should use 50 however you are free to use pretty much any number you want. As you can see there is also an Emulate Ctrl+C toggle : if commands aren't working for you, try to enable this.
Note that you can open this plugin app directly to test the commands and your setup easily.
- If you are going with Termux, it's a bit tricky but definitely possible even for less advanced users.
- Open Termux. Run this command which will setup everything for you :
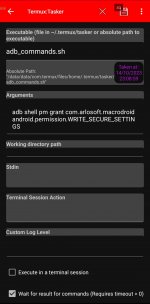
cd ~/.termux/tasker && echo '$1 $2 $3 $4 $5 $6 $7 $8 $9' > adb_commands.sh && chmod +x adb_commands.sh && adb kill-server && adb start-server && sleep 2 && adb devices
As a result, you should see the device "emulator-5554" in the device list. If that's not the case it means something went wrong. The command also created a script called adb_commands.sh which you can call from MacroDroid as a plugin action. You can have a command with a maximum of 9 arguments. Here's an example :
Hopefully this thread is good enough for most to understand.
If you haven't done this before, it would be great to have some feedback on how well that works. It can be simplified further but at this point you could just make a macro that does this for you.
Attachments
Last edited: